Out of Office XPages Web App for HCL Notes/Domino
The Out of Office XPages web app for HCL Notes/Domino is part of the Extracomm Out of Office Manager solution. To access your Out of Office profile from other devices, e.g. iPhone/iPad/Android please read about the Out of Office Manager for more information.
To access a Out of Office profile from a web browser, you need only to install the Out of Office (OOO) server component.
How it works:

Access the XPages Web App on a Domino server with following URL:
http://hostname/ooo.nsf (or https://hostname/ooo.nsf for SSL connection)
OOO Web App (OOO.nsf)
 Revision History
Version 2.1.9 - September 23, 2013
- Out-of-Office notifications can now be sent in various different date formats.
Examples:
9/9/13
Sep 9, 2013
September 9, 2013
Monday, September 9, 2013 |
Version 2.1.7 - May 28, 2013
- Out-of-Office Web App has been localized to German and Italian. |
Version 2.1 - May 14, 2012
- Added a new option "Do not reply to mail from Internet addresses"
- Optimized for mobile web browser |
Version 2.0 - Feb 10, 2012
- Initial release |
A few steps to set Out-of-Office for someone else:
|
Click the image to enlarge |
Three looks from three different platforms:
|
Web Browser on Desktop or iPad |
|
|
Mobile Web Browser on iPhone | Mobile Web Browser on Android |
|
After installation of the OOO server component and once the OOO task starts for the first time, a new OOO.nsf database will be created from template OOO.ntf.
OOO server component
You need to install this server component in order to have the XPages web app installed (ooo.nsf).
For both download and installation instructions, please read about the OOO server component for more information.
How to use it
1) Access the XPages Web App on Domino server using the following URL syntax:
http://hostname/ooo.nsf (or https://hostname/ooo.nsf for SSL connection)
2) Fill in the user name and password information.
3) If you have been assigned the Admin ACL role in OOO.nsf, you are allowed to configure and enable the Out of Office profile for other users and thus the "Select User" section will be available.
- Input or select a user from the Domino Directory name picker.
- Click Get Profile to retrieve their current Out of Office profile settings.
4) If it is successful, the Out of Office profile settings will be loaded from the server.
5) You can now set the Leaving and Returning dates and also customize the auto-response mail subject and body as needed.
6) Switch Enable to "ON" in order to turn on Out of Office notifications or select "OFF" to disable Out of Office notifications.
7) Click "Update" to save your changes back to the server.
Note:
1) The "Specify hours" option is disabled if the Domino server is running in Out of Office Agent mode. To use this feature, you must have the Domino server configured to use the Out of Office service instead.
ACL Security Settings
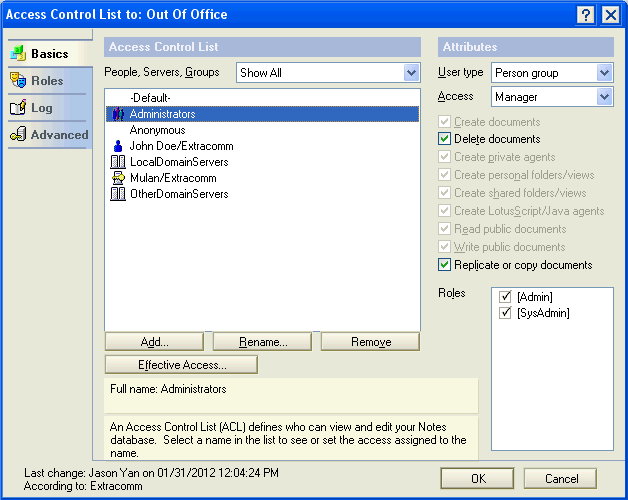
If you are the Manager of the OOO.nsf application, you can grant OOO Admin/SysAdmin rights to other people.

There are two roles that can be assigned:
| Role | Description |
| Admin | When logged in via the Web App, individuals who have been assigned the Admin role, will have the option of selecting other people and setting up that person's Out of Office profile.
 |
| SysAdmin | When logged in via the Web App, individuals who have been assigned the
SysAdmin role, will have the ability to review the Out of Office Manager license information, by selecting the "License Info" link at the top right corner of the application.
http://hostname/ooo.nsf

or when they access the OOO servlet page
http://hostname/servlet/OOO

|
Regular end users who you want to login and enable their own personal Out of Office profile, should only have Reader access with Read/Write Public documents privilege in the database ACL and no roles should be assigned.
The Application owner should have Manager ACL access and also be assigned the SysAdmin & Admin role.
For Domino administrators or Helpdesk staff, they should only have Reader ACL access and be assigned the Admin role.
Date/Time Format
The date/time format will respect the existing settings used in the Web Browser
 Detailed Steps
To change the date format in Internet Explorer:
- Choose Internet Options from the Tools menu.
- Click the Languages button on the General tab.
- Click "Add" to add another language to the list. Make sure the desired language is at the top of the list.
- Restart the browser.
To change the date format in Firefox (Windows):
- Choose Options from the Tools menu.
- Click the Advanced icon and choose the General tab.
- Click the Choose button to select the desired language.
- Click "Add" to add another language to the list. Make sure the desired language is at the top of the list.
- Restart the browser.
To change the date format in Firefox (OS X):
- Choose Preferences from the Firefox menu.
- Click the Languages button on the General tab.
- Click "Add" to add another language to the list. Make sure the desired language is at the top of the list.
- Restart the browser.
To change the date format in Safari (OS X):
- Choose System Preferences from the Apple menu and click Date and Time.
- Click the Open International button.
- Set the language with the desired format at the top of the languages list.
- Verify that the desired format appears on the Formats tab. If it does not, switch the Region or click the customize button to modify the format.
- Restart the browser.
Enabling The Name Picker Feature
By default, the name picker function is not installed, though it can be added.

To enable the Name Picker feature, please read the Out of Office XPages Web App - The Extended Template OOOEx.ntf for more information.
Enabling The Mobile Web Interface
To enable the mobile web interface, please read the Out of Office XPages Web App - The Extended Template OOOEx.ntf for more information.
Support:
Enjoy using the program and please report any problems or feature suggestions to us.
Email: support@extracomm.com
Share with your friends:
Related Links
Other Extracomm Products: